Wix Blog
Customising the Blog Feed Page
Customising the Blog Post Page
Choosing a Different Feed Layout
Changing the Order of Blog Posts
Showing or Hiding the Blog Menu
Showing or Hiding Comments Showing or Hiding Likes
Adding a Gallery to a Blog Post
Adding a Blog Post Cover Image
Adding Divider Lines to a Post
Assigning a Category to a Post
Wix Plug-Ins
This guide will only discuss tools and elements that are used or featured in our templates. For the full range of features available with Wix please view this help article.
For demonstration purposes, I’ll be using one of our Wix Website Templates.
This guide will only discuss tools and elements that are used or featured in our templates. For the full range of features available with Wix please view this help article.


Customising the Blog Feed Page
The list of posts you see when you go to your site's blog page is called your blog feed.
To design your blog and category feeds:
-
Click the Blog page in your Editor.
-
Click Settings.
-
Click the Design tab to customise each section:
-
Click the Expand icon to select a title font and click the colour box to select a title colour.
-
Click the Expand icon to select a description font and click the colour box to select a description colour.
-
Click the colour box to choose a hover colour.
-
Drag the slider to change the opacity.
-
Drag the slider to change the border width.
-
Drag the slider to change the post background.
-
Drag the slider to change the feed background.
-


Customising the Blog Post Page
The post page is the page that opens up when a site visitor views a single post.
To design your post page:
-
Click the Blog Post page in your Editor.
-
Click Settings.
-
Click the Design tab to customise each section:
-
Click the Expand icon to select a title font and click the colour box to select the title colour.
-
Click the Expand icon to select a link font and click the colour box to select the link colour.
-
Drag the slider to adjust the background opacity & colour.
-
Drag the slider to adjust the border colour.
-
Drag the slider to adjust the border width.
-


Selecting Layouts for the Posts Feed
-
Click the Wix Blog app in your Editor.
-
Click Settings.
-
Click the Layout tab.
-
Choose a layout from the options available (we are using the Editorial layout in this article).
-
Choose the Image Ratio for each post.
-
Customise the Layout Settings:
-
Post size: This allows you to control the number of cards per row.
-
Spacing between posts: This allows you to control the spacing between posts.
-
Text box height: After changing display settings or font size, you can use text box height to ensure your box is the optimal size for the content.
-
Feed margins: This allows you to adjust both right/left and top/bottom margins at once.
-
Text padding (left to right): This allows you to adjust the space between the text and the border of the text box.
-
-
Customise the Post Loading:
-
Select how posts should load:
-
On scroll down: Display in an endless scroll.
-
With page numbers: After a set number of pages load, visitor can click to view the next.
-
-
Choose how many posts should load:
-
Drag the slider to select how many posts appear per page or with every scroll.
-
-
-
Click the Category Feed tab to customise the layout settings for the category feed.


Creating Blog Categories
-
Go to the Categories tab in your Blog.
-
Click New Category.
-
Enter a category label in the Category Label field (appears in the blog menu and at the bottom of blog posts in this category).
-
Enter a category title in the Category Title field (appears in search engine results and when sharing a category on social media).
-
Enter a category description in the Category Description field (appears in search engine results and when sharing a category on social media).


Changing the Blog Posts Order
Your blog posts appear in chronological order. You can change the order of the posts, by changing the creation dates.
To change the date of a post:
-
Click to edit a blog post or create a new one.
-
Click the Settings icon on the left side panel.
-
Click the Publish Date box.
-
Click the date and click to select a new date from the calendar.
-
Click Save & Publish
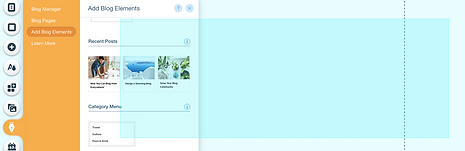

Adding a "Recent Posts" Element
-
Go to the page you want the feed to appear on.
-
Click the Wix Blog app in your Editor.
-
Click Add Blog Elements.
-
Choose a Recent Posts element.
-
Drag it to position it on the page.
-
Click Settings.
-
Click the Display tab and select which elements you want to show.
-
Click the Design tab to customise any of the colours, fonts, borders or backgrounds.

Featuring Posts
You can mark any post that you're creating or editing as "featured" by enabling the toggle in the post's settings.
-
Go to the Blog tab in your site's dashboard.
-
Click Create New Post or Edit to edit an existing post.
-
Click the Settings tab on the left side panel.
-
Click the Set as Featured Post toggle to enable it.
Showing or Hiding the Menu
Wix blog comes with a menu to help your readers navigate to different blog categories. The menu appears on your blog feed and your post page. You can customise each place separately.


Show or Hide the Menu in the Blog Feed
-
Click the Wix Blog app in your Editor.
-
Click Settings.
-
Click the Display tab.
-
Click Blog Menu.
-
Click the Show blog menu toggle to show or hide the menu.
Show or Hide the Menu in Your Post Page
-
Click the Wix Blog app in your Editor.
-
Click Blog Pages.
-
Click Post.
-
Click Settings.
-
Click the Display tab.
-
Click Blog Menu.
-
Click the Show blog menu toggle to show or hide the menu.

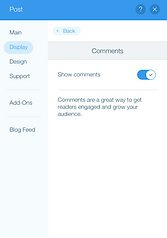
Showing or Hiding Comments
-
Click the Wix Blog app in your Editor.
-
Click Settings.
-
Click the Display tab.
-
Select or deselect the comments counter.
Showing or Hiding Like
-
Click the Wix Blog app in your Editor.
-
Click Settings.
-
Click the Display tab.
-
Select or deselect the likes counter.

Deleting Your Blog
-
Click Menus & Pages on the left side of the Editor.
-
Hover over the Blog page and click Show More.
-
Click Delete.
-
Click Delete to confirm.


Adding a Blog Post
-
Go to your site's dashboard
-
Click on the Blog tab on the left.
-
Click Create New Post.
-
You can add any of the following to a post:
-
Images or GIFs: Click the Image icon and select an image or GIF to upload or choose a GIF from the integrated options by clicking the GIF icon.
-
Galleries: Click the Gallery icon and select images to upload.
-
Videos: Click the Video icon and add a video.
-
Divider lines: Click the Divider icon to add a divider line, then customise it.
-
HTML: Click the HTML icon to embed an iframe or display an external site in a post.
-
Quotations: Highlight the text you want to quote and click the Quotation icon .
-
Links: Highlight the text you want to make into a link, click the Link icon, enter the URL and click update.
-


Deleting a Blog Post
-
Go to the Posts tab in your site's dashboard.
-
Click the Show More icon next to the post you want to delete.
-
Click Move to Trash.
-
Click Move to Trash to verify.
Note: Once a post is moved to trash, the views, likes, and comments are deleted permanently. Even if you restore the post, views, likes, and comments are not restored.

Editing a Blog Post
-
Go to your site's dashboard
-
Click on the Blog tab on the left.
-
Click Edit to edit an existing post.
-
You can add any of the following to a post:
-
Images or GIFs: Click the Image icon and select an image or GIF to upload or choose a GIF from the integrated options by clicking the GIF icon.
-
Galleries: Click the Gallery icon and select images to upload.
-
Videos: Click the Video icon and add a video.
-
Divider lines: Click the Divider icon to add a divider line, then customise it.
-
HTML: Click the HTML icon to embed an iframe or display an external site in a post.
-
Quotations: Highlight the text you want to quote and click the Quotation icon .
-
Links: Highlight the text you want to make into a link, click the Link icon, enter the URL and click update.
-


Duplicating a Blog Post
-
Go to the Blog tab on your site dashboard.
-
Click the Show More icon on the published post or draft you want to duplicate.
-
Click Duplicate Post.

Unpublishing a Blog Post
-
Go to your site's dashboard.
-
Click the Blog tab.
-
Click Edit on the post you want to unpublish.
-
Click the Expand icon in the top right.
-
Click Revert to Draft.

Scheduling a Blog Post to be Published Later
-
Go to the Blog tab in your site's dashboard.
-
Click Create New Post.
-
Add in the relevant content.
-
Click the Expand icon at the top right.
-
Click Schedule Post.
-
Choose when you want to the post to go live.
-
Click Schedule.


Adding an Image to a Blog Post
-
Go to the Blog tab in your site's dashboard.
-
Do one of the following:
-
Click Create a post to start a new post.
-
Click the Show More icon on the relevant post and click Edit Post.
-
-
Choose the camera icon to add an icon.
-
Select the image from your Media Manager or click Upload Media to upload a new image.
-
Click Add to Page.


Adding a Gallery to a Blog Post
-
Go to the Blog tab in your site's dashboard.
-
Do one of the following:
-
Click Create a post to start a new post.
-
Click the Show More icon on the relevant post and click Edit Post.
-
-
You can format the gallery using any of these options. To start, just click the gallery.
-
Upload Media: Click to upload images.
-
Gallery Layout: Click to select a gallery layout.
-
Gallery Size: Select a size setting: small, best fit, full width.
-
Gallery Alignment: Align the gallery left or right.
-
Organise Media:
-
Drag images to reorder them.
-
Click an image and Delete to remove it.
-
Click an image and Edit to replace it, add alt text, or add a link.
-
Click to select layout options. The available options vary according to which layout you choose.
-
-
Delete: Click to delete the gallery.
-

Adding Links in Your Blog
-
Go to the Blog tab in your site's dashboard.
-
Do one of the following:
-
Click Create a post to start a new post.
-
Click the Show More icon on the relevant post and click Edit Post.
-
-
Highlight the text to which you want to add a link.
-
Click the Link icon.
-
Enter the address (URL) you want to link to.
Adding a Cover Image to a Blog Post


A cover image is the image displayed together with a post:
-
In your blog feed
-
When sharing a post on social media
-
In a Custom Feed element
-
In a Recent Posts element
To add a cover image to post:
-
Go to your site's dashboard.
-
Click the Blog tab.
-
Click to edit a blog post or create a new one.
-
Click Post Settings tab on the left.
-
Click the Display Cover Image toggle to enable it.
-
Click the image box to add a new cover image.
-
Select an option:
-
Upload an image:
-
Click Upload Media.
-
Select a file in the Media Manager.
-
Click Open.
-
Click Done.
-
Click Add to Page.
-
-
Replace the existing image:
-
Select an image.
-
Click Add to Page.
-
Click Save or Publish to apply the changes.
-
-


Adding Divider Lines to Posts
-
Start writing a post from your live site or from the Post Manager.
-
Click the Divider icon at the bottom of the page.
-
Customise the divider line:
-
Click the Divider Style drop-down menu and select a style.
-
Select a line size: Small, medium, or large.
-
Select a justification setting: Left, right, or centre.
-

Editing Excerpts in Wix Blog
-
Go to the Post tab in your site's dashboard.
-
Click to edit a blog post or create a new one.
-
Click Post Settings at the top left.
-
Click on the Advanced tab.
-
Enter the excerpt text in the Excerpt field (maximum 140 characters).

Changing the Author of a Post
-
Go to the Post tab in your site's dashboard.
-
Click to edit a blog post or create a new one.
-
Click Post Settings at the top left.
-
Select who you want to re-assign the post to from the Author drop-down menu.
-
Click Save & Publish.

Assigning a Category to a Post
-
Go to the Post tab in your site's dashboard.
-
Click to edit a blog post or create a new one.
-
Click Post Settings at the top left.
-
Click the Categories tab.
-
Click to select the categories you want to assign. (Up to 10 categories).
-
Click Save & Publish.
Disabling the Reading Time Stamp on Posts
-
Click the Wix Blog app in your Editor.
-
Click Settings.
-
Click the Display tab.
-
Deselect the Date and reading time checkbox.


Enabling or Disabling Commenting in Blog Posts
Turn Commenting On or Off for a Specific Post
-
Go to the Post tab in your site's dashboard.
-
Click to edit a blog post or create a new one.
-
Click Post Settings at the top left.
-
Click the Advanced tab.
-
Click the Show blog menu toggle to show or hide the menu.
Turn Commenting On or Off for All Blog Posts
-
Go to your Blog Posts page.
-
Click the Post Page in your Editor.
-
Click Settings.
-
Click the Display tab.
-
Scroll down and click Recent Posts & Comments.
-
Click the Show Comments toggle:
-
Enabled: Site visitors can leave comments.
-
Disabled: Site visitors cannot leave comments.
-